Stripe to QuickBooks Automation | n8n Workflow for Auto-Bookkeeping
Curated by n8n Markets team
Last updated: April 19, 2026
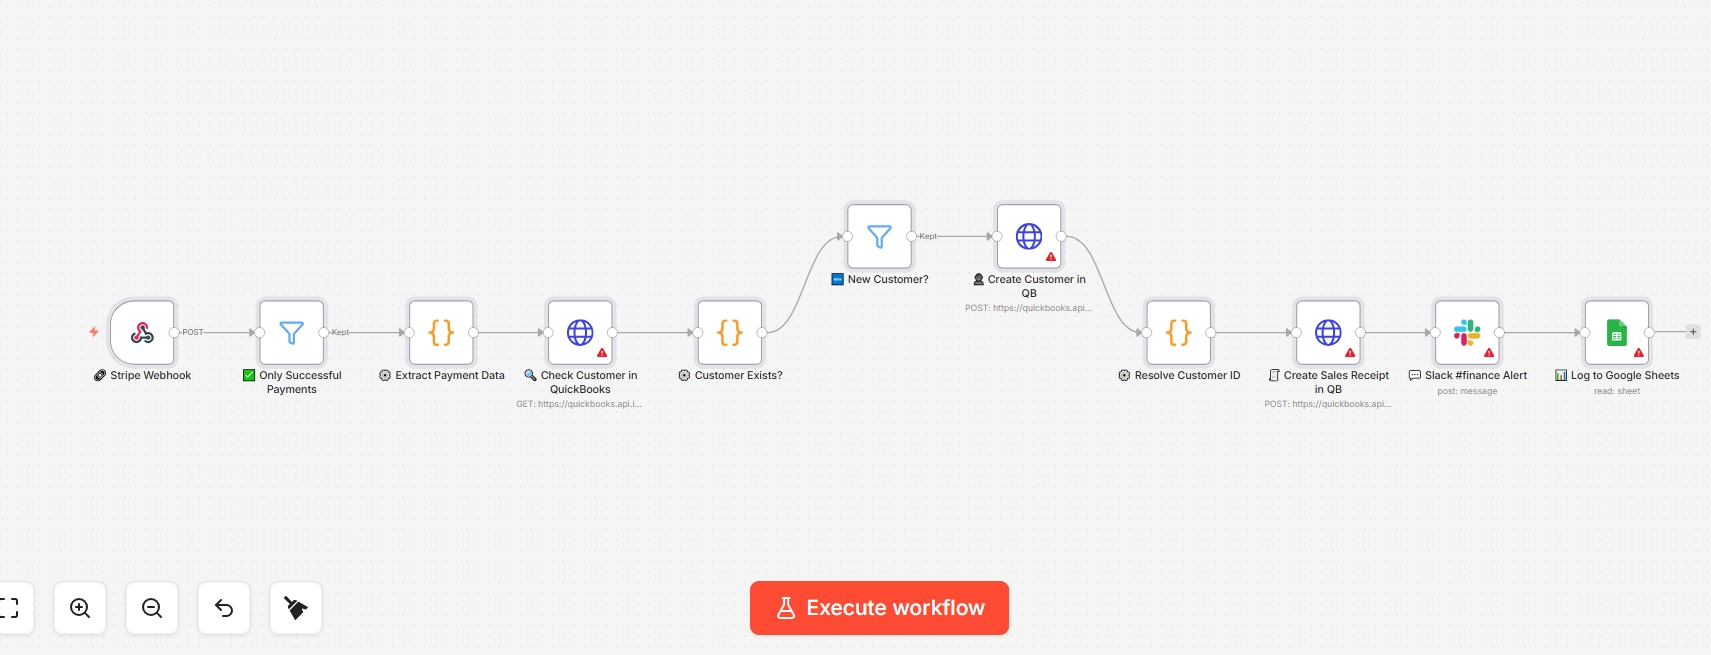
Bismillahir Rahmanir Rahim Stop manual data entry in QuickBooks. This production-ready n8n workflow automatically syncs Stripe payments to QB Sales Receipts. Includes error-handling to prevent duplicate customers and protects your financial data. The Stripe → QuickBooks Auto-Receipt Bot eliminates manual bookkeeping by listening for every successful Stripe payment in real time. The moment a payment succeeds, it automatically creates or looks up the customer in QuickBooks, generates a Sales Receipt with the correct amount and date, alerts your Slack #finance channel, and logs the transaction to Google Sheets — all within seconds, with no human involvement. SUCCESS: Critical financial safety feature If customer ID resolution fails for any reason, the workflow throws a detailed error and does NOT create the receipt. This prevents silent mis-filing of receipts to the wrong QuickBooks customer — protecting your bookkeeping accuracy. The error message includes the Stripe Payment ID and customer details for manual reconciliation. 1.1 What the workflow does ⦁ Receives real-time payment events from Stripe via webhook ⦁ Filters to process only payment_intent.succeeded events ⦁ Validates the payment amount and ID — rejects malformed payloads ⦁ Searches QuickBooks for the customer by email ⦁ Creates a new QuickBooks customer if not found — with duplicate-name protection ⦁ Resolves the customer ID safely — throws an explicit error if it cannot be confirmed ⦁ Creates a Sales Receipt in QuickBooks with the Stripe Payment ID in the private note ⦁ Sends a Slack alert to your #finance channel with full payment details ⦁ Logs the transaction to Google Sheets with QB customer source for audit trail 1.2 Node-by-node flow [Stripe Webhook] → [Filter: Payment Succeeded] → [Extract Payment Data] → [Check Customer in QB] → [Customer Exists?] → [New Customer? (branch)] → [Create Customer in QB] → [Resolve Customer ID] → [Create Sales Receipt] → [Slack Alert] → [Log to Sheets] Node Type Purpose Stripe Webhook Webhook Receives Stripe payment events Only Successful Payments Filter Passes only payment_intent.succeeded Extract Payment Data Code (JS) Parses Stripe payload, validates amount + ID Check Customer in QB HTTP Request Queries QB for customer by email Customer Exists? Code (JS) Determines new vs existing customer New Customer? Filter Branches: only creates if new Create Customer in QB HTTP Request Creates new QB customer with payment ID suffix Resolve Customer ID Code (JS) CRITICAL: confirms ID or throws safe error Create Sales Receipt HTTP Request Creates QB Sales Receipt with Stripe reference Slack #finance Alert Slack Notifies finance channel with payment details Log to Google Sheets Google Sheets Saves transaction log with audit fields 2. Prerequisites IMPORTANT: This workflow has the most setup steps — read this section carefully Four separate services require configuration: Stripe, QuickBooks, Slack, and Google Sheets. Complete them in the order shown in Section 4 — the sequence matters. 2.1 Required accounts Service What you need Where to get it Stripe Access to Stripe Dashboard (Developers section) dashboard.stripe.com QuickBooks Active QuickBooks Online subscription + Developer App developer.intuit.com Slack Slack workspace with a #finance channel + Bot App api.slack.com/apps Google Google account for Sheets + OAuth sheets.google.com 2.2 Find your QuickBooks Company ID 1. Log into QuickBooks Online. 2. Click the Gear icon (top right) → Account and Settings. 3. Your Company ID is displayed — it is a long number like 9341452689543210. 4. Copy it — you will need to paste it into 3 nodes. WARNING: Company ID must be replaced in 3 separate nodes Check Customer in QuickBooks — in the URL field Create Customer in QB — in the URL field Create Sales Receipt in QB — in the URL field Missing even one will cause that node to 404 with a confusing error. 3. QuickBooks Developer App Setup QuickBooks requires OAuth2 authentication via a Developer App. This is a one-time 15-minute setup. 1. Go to developer.intuit.com → sign in with your QuickBooks credentials. 2. Click Create an App → select QuickBooks Online and Payments. 3. Give your app a name (e.g. "n8n Finance Bot") → Create App. 4. In the app dashboard, go to Keys & Credentials. 5. Under Redirect URIs, add your n8n OAuth callback URL. In n8n: Settings → OAuth Redirect URL → copy and paste here. 6. Copy the Client ID and Client Secret from the Production section. 3.1 Connect QuickBooks in n8n 1. Click the Check Customer in QuickBooks node → Credential → Create New → OAuth2 API. 2. Fill in: Auth URL = https://appcenter.intuit.com/connect/oauth2, Token URL = https://oauth.platform.intuit.com/oauth2/v1/tokens/bearer 3. Enter Client ID and Client Secret → click Connect → authorise QuickBooks. 4. The same credential applies to all 3 QuickBooks nodes automatically. 4. Slack Setup 1. Create a channel named exactly #finance in your Slack workspace. All lowercase. The node references "finance" without the # symbol. 2. Go to api.slack.com/apps → Create New App → From Scratch. 3. Name your app (e.g. "Finance Bot") and select your workspace. 4. Under OAuth & Permissions → Bot Token Scopes → Add: chat:write 5. Click Install to Workspace → Allow. 6. Copy the Bot OAuth Token — starts with xoxb- 7. In n8n: click the Slack #finance Alert node → Credential → Create New → Slack API → paste token. 8. In Slack, open the #finance channel and type: /invite @YourBotName Replace YourBotName with the name you gave the app. Without this, the bot gets "channel_not_found".
What's Included
- WORKFLOW GUIDE
Requirements
Version v1.1.0 (Fixed) Trigger Scheduled — every 2 hours Integrations Upwork RSS • Google Sheets • OpenAI • Telegram Cost to run ~$0.001 per proposal (essentially free to operate) Difficulty Beginner — requires Telegram bot setup (5 min) Avg setup time 20–25 minutes
How to Use
Version v1.1.0 (Fixed) Trigger Scheduled — every 2 hours Integrations Upwork RSS • Google Sheets • OpenAI • Telegram Cost to run ~$0.001 per proposal (essentially free to operate) Difficulty Beginner — requires Telegram bot setup (5 min) Avg setup time 20–25 minutes
Apps in this n8n workflow
How to import this template into n8n
- Download the workflow JSON file from this page.
- In n8n, open Workflows, create a new workflow and choose Import from File.
- Open each node that shows a warning and connect your own credentials.
- Run the workflow once manually to check the output before you activate it.
- Importable n8n workflow JSON file
- Download with Builder Pro or Agency Unlimited
- Built for n8n v1.0+
- Setup time: 30 minutes
Included in Builder Pro — $19/mo, 4,177 premium workflows
Before you activate
Templates are reviewed before they are listed. Test with your own credentials and data before running it in production.
100% Secure Checkout
Refund requests within 7 days of a new subscription
Dependencies & Requirements
⚠️ 1 service require credentials. Make sure you have accounts set up before importing.
0 reviews
No reviews yet.
Questions & Answers
Log in to ask a question.
No questions yet. Be the first to ask!
People Also Bought
Related Automation n8n templates
- Generate AI Videos with Google Veo3, Save to Google Drive and Upload to YouTube
- Scrape and summarize webpages with AI
- Create a Branded AI-Powered Website Chatbot
- Angie, Personal AI Assistant with Telegram Voice and Text
- AI agent chat
- Automated Web Scraping: email a CSV, save to Google Sheets & Microsoft Excel
- Respond to WhatsApp Messages with AI Like a Pro!
- Basic Automatic Gmail Email Labelling with OpenAI and Gmail API